CHARGING SYSTEM > ON-VEHICLE INSPECTION |
for Preparation Click here
| 1. CHECK BATTERY ELECTROLYTE LEVEL |
Check the electrolyte level.
If the electrolyte level is low, replace the battery (or add distilled water) and check the charging system.
| 2. CHECK BATTERY SPECIFIC GRAVITY |
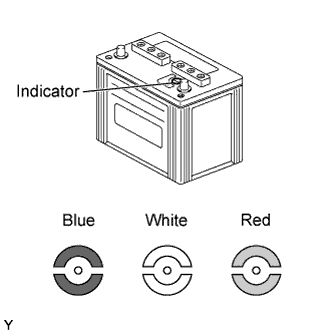
Check the color of the indicator.
- Result:
Indicator Color Condition Blue Good White Charging necessary Red Replacement necessary
 |
| 3. CHECK BATTERY VOLTAGE |
Turn the ignition switch off and turn on the headlights for 20 to 30 seconds. This will remove the surface charge from the battery.
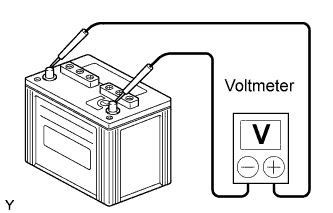
Measure the battery voltage according to the value(s) in the table below.
- Standard Voltage:
Tester Connection Condition Specified Condition Battery positive terminal - Battery negative terminal 20°C (68°F) 12.5 to 12.9 V
 |
| 4. CHECK BATTERY TERMINAL |
Check that the battery terminals are not loose or corroded.
If the terminals are corroded, clean them.
| 5. CHECK FUSES |
Measure the resistance of the charging system fuses.
- Standard resistance:
- Below 1 Ω
| 6. INSPECT V-RIBBED BELT |
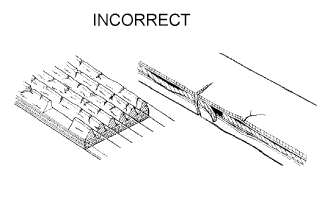
Check the belt for wear, cracks or other signs of damage.
If any of the following defects is found, replace the V-ribbed belt.- The belt is cracked.
- The belt is worn out to the extent that the cords are exposed.
- The belt has chunks missing from the ribs.
- The belt is cracked.
 |
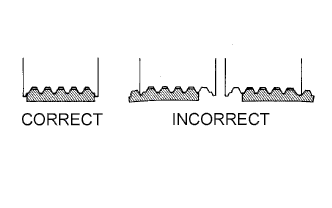
Check that the belt fits properly in the ribbed grooves.
- HINT:
- Check with your hand to confirm that the belt has not slipped out of the groove on the bottom of the pulley. If it has slipped out, replace the V-ribbed belt. Install a new V-ribbed belt correctly.
 |
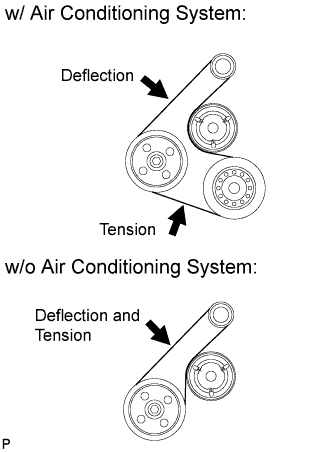
Check the V belt deflection and tension.
- Deflection:
Item Specified Condition New belt 7.0 to 8.2 mm (0.276 to 0.323 in.) Used belt 7.6 to 10.0 mm (0.299 to 0.394 in.)
- Tension:
Item Specified Condition New belt 700 to 800 N (71 to 82 kg, 157 to 180 lb) Used belt 550 to 750 N (56 to 77 kg, 124 to 169 lb)
- HINT:
- When inspecting the V belt deflection, apply 98 N (10 kgf) tensile force to it.
- After installing a new belt, run the engine for approximately 5 minutes and then readjust the tension to (new belt) specifications.
- Check the V-ribbed belt deflection and tension at the specified point.
- V-ribbed belt tension and deflection should be checked after 2 revolutions of the engine.
- V-ribbed belt tension and deflection should be checked at TDC crank angle and cold condition.
- When adjusting a belt, adjust its deflection and tension to the intermediate values of the specification.
- When reinstalling a belt which has been used for over 5 minutes, adjust its deflection and tension to the used belt specification.
- When using a belt tension gauge, confirm its accuracy by using a master gauge first.
- If using a sonic tension meter:
- Weight:
- 15 g/rib*m
- Width:
- 6 ribs
- Span:
- 188 mm (7.40 in.) (w/ air Conditioning)
- 282 mm (11.1 in.) (w/o air Conditioning)
 |
| 7. VISUALLY CHECK GENERATOR WIRING |
Check that the generator wiring is in good condition.
If the condition is not good, repair or replace the generator wire.
| 8. LISTEN FOR ABNORMAL NOISES FROM GENERATOR |
Check that there is no abnormal noise from the generator while the engine is running.
If there is abnormal noise, replace the pulley or generator.
| 9. CHECK CHARGE WARNING LIGHT CIRCUIT |
Turn the ignition switch to ON. Check that the charge warning light comes on.
Start the engine and check that the light goes off.
If the light does not operate as specified, troubleshoot the charge warning light circuit.
| 10. CHECK CHARGING CIRCUIT WITHOUT LOAD |
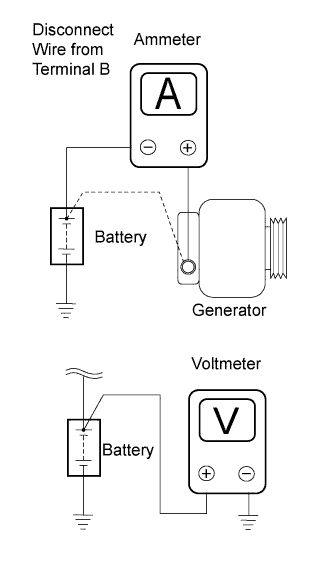
According to the following procedure, connect an ammeter and voltmeter as shown in the illustration.
Disconnect the wire from terminal B of the generator and connect it to the negative (-) lead of the ammeter.
Connect the positive (+) lead of the ammeter to terminal B of the generator.
Connect the positive (+) lead of the voltmeter to the positive (+) terminal of the battery.
Ground the negative (-) lead of the voltmeter.
 |
Check the charging circuit.
While keeping the engine speed at 2000 rpm, check the readings on the ammeter and voltmeter.
- Standard current:
- 10 A or less
- Standard voltage:
- 13.2 to 14.8 V
- HINT:
- If the battery is not fully charged, the ammeter reading may be more than the standard current.
| 11. CHECK CHARGING CIRCUIT WITH LOAD |
Keep the engine speed at 2000 rpm, turn on the high beam headlights, and turn the heater blower switch to the "HI" position.
Check the reading on the ammeter.
- Standard current:
- 30 A or more
- HINT:
- If the battery is fully charged, the ammeter reading may be less than the standard current. In this case, increase electrical load by operating devices such as the wiper motor and rear window defogger. Then, recheck the reading on the ammeter.
